Table of Contents
Introduction
Welcome to the attack tutorial. This page will help you with how the cyber attacks and testing part of the simulator work.
Attack Menu
First we will go through the attack menu (the sword icon) which can be found in the bottom right of the simulator:
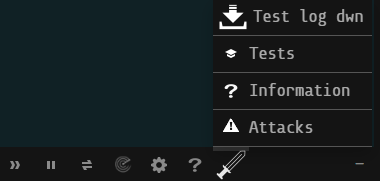
This menu contains 4 different sub-menus:
- Test log down
- Tests
- Information
- Attacks
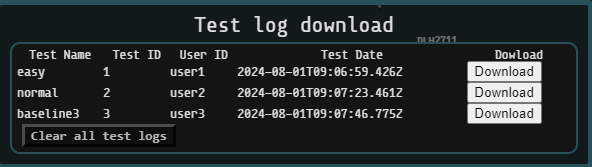
Test log down
Here you can see all the test results on the client and also download these.
It is especially useful if you don't want to send any feedback after a test is done.
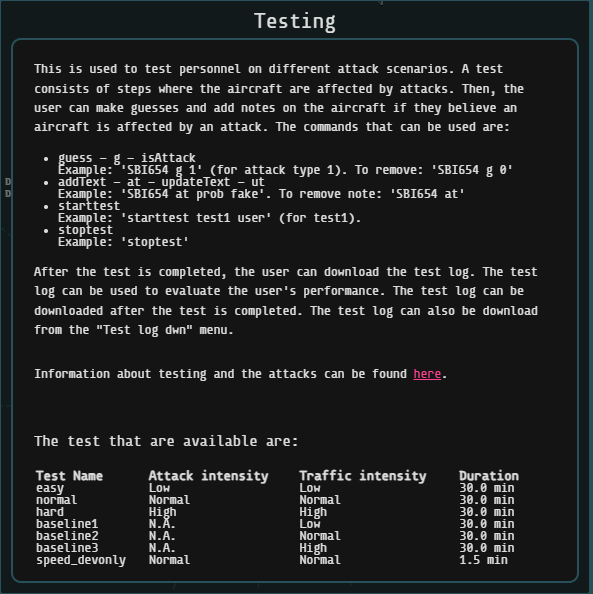
Tests
First we have a brief guide on how to start and stop a test, as well as commands on how
to add notes to an aircraft and make a guess if you think an aircraft is affected by an attack.
The testing menu also contains a list of all the available tests that can be performed in the simulator.
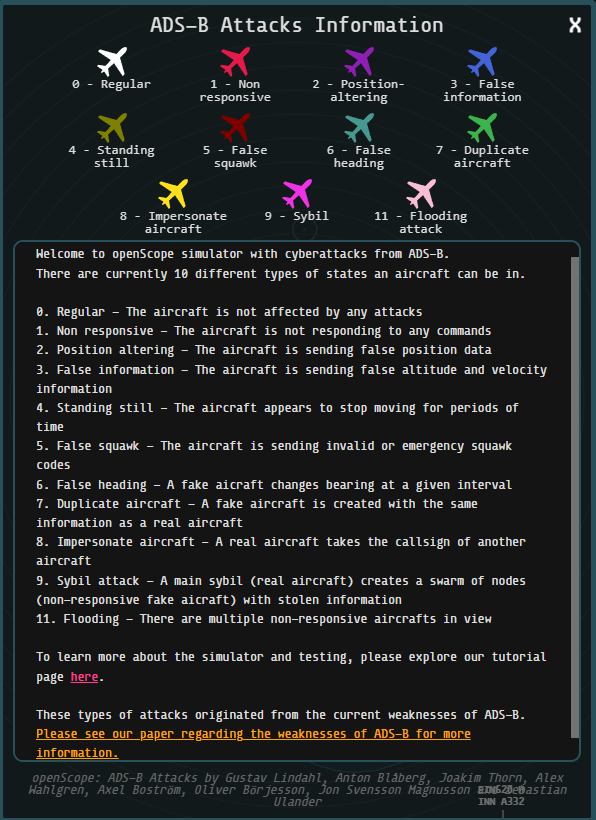
Information
Here you can find information about the attacks that are available in the simulator and see which number that corresponds to which attack.
Attacks
Here you have all the settings for attacks in the simulator.
The settings are split up into different categories which are the following:
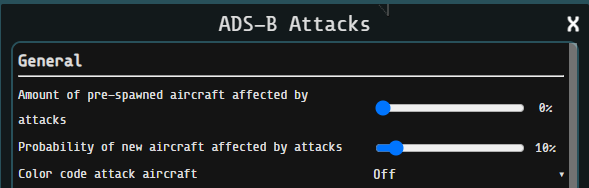
General
Here you can set the probability of how many aircrafts will be affected by an
attack when the simulator is reset. This goes up to a maximum of 60%, meaning there will always be unaffected
aircraft existing when a simulation is started.
We can also set the probability of new aircraft being affected by an attack.
With new aircraft we mean the aircraft that will come into radar view eventually.
The last setting here is to highlight the affected aircraft with their corresponding color
so it's easy to distinguish what aircraft is affected by what attack. This setting is off during tests.
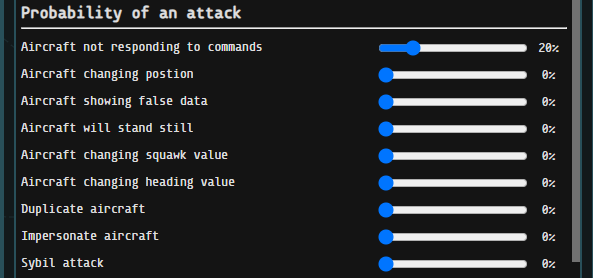
Probability of an attack
Here you can set the probability of each attack appearing. For example, if two attacks are each set to 50%,
and the rest are set to 0%, there is a 100% chance that an affected aircraft will be impacted by one of those two attacks.
If the probability of a new aircraft being affected is at 100%, it does not matter if the probability for a single attack
to be affected is only at 1%, the new aircraft will be affected by that attack.
Jumping options
Here you can set the probability of an aircraft, affected by Aircraft changing position, jumping to a new location.
The distance of jumps is a setting to how wide the radius of jumps can be.
Maximum number of jumps decides how many times an aircraft affected by Aircraft changing position can jump before stopping. It goes from 3-7

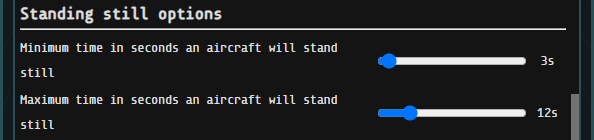
Standing still options
The time of standing still is a setting to how long the aircraft will stand still. It goes from 3-12 seconds.
False heading options
Here you can change how much the heading will change during the false heading attack, as well as how often it will change.

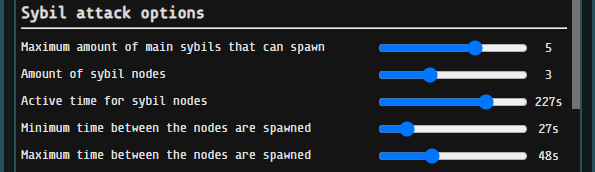
Sybil attack options
The first option here is the maximum number of aircraft that can be a main sybil.
The second option is the maximum number of sybil nodes each main sybil can spawn.
The third option is to configure how long each sybil attack will be. After this time the sybil nodes will despawn.
The fourth and fifth option decides the time of when nodes can spawn after another set of nodes has despawned.
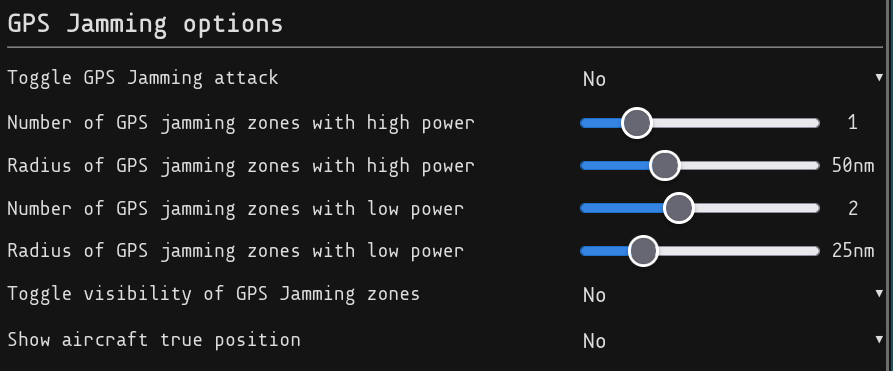
GPS Jamming options
GPS jamming options can be controlled with three toggles and four sliders. The first toggle determines if GPS-jamming attacks should be present in the simulation. The second toggle allows you to choose whether the jamming zones should be visible in the map. The third toggle allows you to see the real position of the aircraft, even during GPS-jamming attacks. The four sliders determine how many high and low powered attacks should be present and their radius.
Other attacks
Here you can set the amount of aircrafts that appear when flooding is happening. Beware that a high number of aircraft will slow down your PC.

Other attack options
Here you can set the minimum radius to another aircraft when direct injecting aircraft. We also have an option here to hide the score.
Although the score will always be hidden during tests.

Reset options
At the bottom there are two buttons to reset the traffic. The first button will reset the simulation
as well as all the attack settings
while the second button will only reset the current traffic.

Getting started with the simulator.
This section helps you get started with the basics of how to use the simulator.
Controlling an aircraft
To control an aircraft you first have to select the aircraft and then type the command you want to make.
- t r or t l followed by a three digit degree to make the aircraft turn right or turn left towards that degree. Eg. UAL767 t r 090.
- t r or t l followed by a two digit degree to turn that many degrees right or left. Eg. UAL767 t r 15.
- sp followed by a speed to make the aircraft go to that speed. Eg. UAL767 t sp 250 to make the aircraft go to 250 knots.
- c or d followed by how many hundred feet you want the aircraft to climb or descend to. Eg. UAL767 c 30 to climb or descend to 3000 feet.
Departure
You can find aircraft ready to depart on the bottom of the strip view menu on the right hand side of the simulator. The first step is always to clear the aircraft to its destination. With the departing aircraft selected, simply type caf (for 'cleared as filed') and press enter. As needed, you can also change the aircraft's routing, and much more. Now tell them taxi followed by the runway number you want to taxi the aircraft to. The aircraft should appear on the scope after about 3 seconds. Now the aircraft is ready for takeoff. Click the aircraft again (or use the PgUp key) and type takeoff (or to) to clear the aircraft for takeoff. Once it's going fast enough, it should lift off the ground and you should see its altitude increasing. Meanwhile, read the next step. Once the aircraft has taken off, you'll notice it will climb to an initial altitude by itself. This is one of the instructions we gave them when we cleared them "as filed". Aircraft get better fuel efficiency when they are able to climb directly from the ground to their cruise altitude without leveling off, so let's keep them climbing! Click it and type cvs (for "climb via SID"). Then they will follow the altitudes and speeds defined in the departure. You can also simply give a direct climb, lifting the restrictions on the SID. Feel free to click the speedup button on the right side of the input box (it's two small arrows) to watch the departure climb along the SID. Then just click it again to return to 1x speed. When the aircraft leaves your airspace, it will switch to center and automatically be removed from your flight strip bay.
Arrival
You can find arrivals and overflights on the top of the strip view menu. Now, onto arrivals. Click on any arriving aircraft in the radar screen; after you've selected it, use the altitude/heading/speed controls you've learned in order to guide it to the intercept of the ILS for the runway. The aircraft must be at an appropriate altitude and flying an appropriate heading (more on this later) in order for it to catch the ILS and land! You can clear aircraft for an ILS approach with the i command, followed by a runway name. When you do so, the aircraft will attempt to intercept the localiser, represented by the extended centerline. Try giving radar vectors to aim the aircraft across the final approach course, with an intercept angle of 30 degrees or less, then tell them i and the runway to clear it for the ILS approach. It should then guide itself down to the runway without any further input from us. If you have trouble, get the airplane lower and have them join the approach further out from the airport.
Combining commands
You can combine as many commands into a single instruction as you'd like, for example caf cvs taxi 30C for departures, t r 250 d 30 i 26 sp 180 for arrivals, or any other time you need.
Getting Started with Testing
This section helps you get started with the basics.
To start a test
To start a test, you need to type the command starttest followed by the name of the test and your username, eg. starttest easy user1.
To see which tests that are available you can go to the Testing menu. At the bottom you can see all the test names as well as some general
information about the tests. Attack intensity is how often planes will be affected by an attack. Traffic intensity is how much traffic the airport
will have. The duration is how long a test will continue for. After the test duration is over the test will automatically stop.
If you for some reason want to stop the test before the duration is over, you can achieve this by using the stoptest command.
How to perform a test
After a test has been started, the simulation will restart. Depending on the test there can now be aircraft affected by some type of cyber attack. If you see an aircraft that looks like it's stuttering, you can deduct that this aircraft is affected by the Standing still attack. When you are sure that this is the case, you can make a guess of the attack type by clicking on the aircraft in question and type g for guess followed by a number that corresponds with the attack (these numbers can be found in the attack information). An example could be UAL767 g 4 for the Standing still attack. When a guess has been made on an aircraft, a coloured triangle will surround the aircraft. The colour will be decided by the colour of the attack that was guessed. If you aren't sure what type of attack an aircraft is being affected by, you can add text next to the aircraft by clicking on the aircraft and typing the command at followed by your note.
An important note to make is that time is a big factor in how the points are given. The faster you are to correctly guess an affected aircraft's attack, the more points you will get, but be causious as you will lose points if you guess wrong. If you feel like you've made the wrong guess, you can remove this by clicking on the aircraft in question and type the command g 0, eg. UAL767 g 0.
The point system
After a test has been completed, you will be able to see your score. The score is based on how many correct guesses you made, how many wrong guesses you made, and how you performed in handling the air traffic. For the guesses, the scoring is as follows:
| Points | Time to guess |
|---|---|
| 100 | 0-1 minute |
| 90 | 1-2 minutes |
| 80 | 2-3 minutes |
| 70 | 3-4 minutes |
| 60 | 4-5 minutes |
| 50 | 5+ minutes |
Points are awarded or deducted based on the following conditions:
- Correct guess: Points are awarded based on the time it took to guess correctly. Points for a correct guess are awarded once.
- Incorrect guess: 100 points are deducted if the user guesses incorrectly. If points have been awarded for a correct guess, they will be deducted if the user guesses incorrectly. Multiple incorrect guesses will result in multiple deductions of 100 points.
- No guess: 100 points are deducted if an attacked aircraft with no guess is removed or the test ends after the aircraft has been under attack for at least 8 minutes.
- Reset guess: If the user resets their guess, then if points have been awarded for a correct guess, they will be deducted.
For the air traffic handling, the scoring is as follows:
| Game Event | Point Value |
|---|---|
| Airspace Bust | -200 |
| Arrival | 10 |
| Collision | -1000 |
| Departure | 10 |
| Extreme Crosswind Operation | -15 |
| Extreme Tailwind Operation | -75 |
| Go Around | -50 |
| High Crosswind Operation | -5 |
| High Tailwind Operation | -25 |
| Illegal Approach Clearance | -10 |
| Localizer Intercept Above Glidescope | -10 |
| Not Cleared On Route | -25 |
| Separation Loss | -200 |
| No Takeoff Separation | -200 |